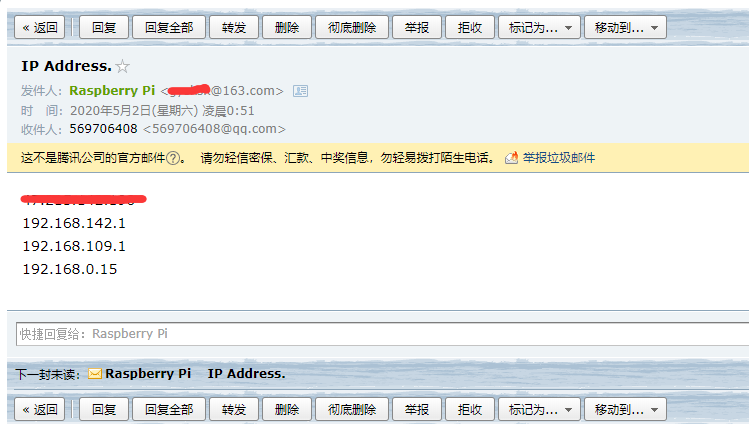
获取树莓派地址的方法有很多,如通过终端下输入命令ifconfig查看,通过串口输入命令ifocnfig
import os
import io
import time
import logging
import socket
import smtplib
import subprocess
import traceback
from email.mime.text import MIMEText
from email.utils import formataddr
from threading import Thread

class IPs(object):
    def __init__(self, config, udp, mail):
        self._vps_ip = config['vps_ip']
        self._vps_port_udp = config['vps_udp_port']

        self._is_udp = udp
        self._is_mail = mail
        self._addrs = self._get_local_ip()

    def start(self):
        try:
            #ip_thd = Thread(target = self._ip_worker, args = (), daemon=True)
            ip_thd = Thread(target = self._ip_worker)
            ip_thd.start()
        except:
            traceback.print_exc()
            logging.error('Thread create failed.[ip_thd].')

    def test(self):
        for i in range(5):
            print('test ',i)
            time.sleep(1)

    def _ip_worker(self):
        info_dict ={'my_ip_info':''}
        while True:
            print("running")
            logging.debug('curl ip')
            proc = subprocess.Popen('curl icanhazip.com', shell=True, \
                stdout=subprocess.PIPE, stderr=subprocess.DEVNULL, bufsize=-1)
            proc.wait()
            stream_stdout = io.TextIOWrapper(proc.stdout, encoding='utf-8')
            ip_info = str(stream_stdout.read()).strip()
            logging.debug('curl ip got:%s' % ip_info)

            if ip_info not in info_dict['my_ip_info']:
                if self._ip_trans(ip_info) == True:
                    info_dict['my_ip_info'] = ip_info
                    logging.info('Sent success:%s.' % ip_info)
                else:
                    logging.error('ip_trans failed.')
            time.sleep(600)

    def _ip_trans(self, ip_info):
        if self._is_udp:
            udp_res = self._udp_ip()
        else:
            udp_res = True
        if self._is_mail:
            mai_res = self._mail_ip(ip_info)
        if udp_res and mai_res:
            return True
        else:
            return False

    def _mail_ip(self, ip_str):
        my_email_sender='[email protected]'        # may subject to change
        my_email_passwd = 'your password'       # may subject to change
        recivers = ['[email protected]']          # may subject to change

        ip_list = []
        for ip in self._addrs:
            if str(ip[0]) == "AddressFamily.AF_INET":
                ip_str = ip_str + '\n' + ip[4][0]

        print(ip_str)

        try:
            for reciver in recivers:
                msg=MIMEText(ip_str, 'plain', 'utf-8')
                msg['From'] = formataddr(['Raspberry Pi', my_email_sender])
                msg['To'] = formataddr(['', reciver])
                msg['Subject'] = 'IP Address.'

                server=smtplib.SMTP_SSL('smtp.163.com', 465)        # may subject to change
                server.login(my_email_sender, my_email_passwd)
                server.sendmail(my_email_sender, [reciver,], msg.as_string())
                server.quit()
                logging.info('e-mail sent success:%s', ip_str)
        except Exception:
            traceback.print_exc()
            logging.error('e-mail sent failed:%s', ip_str)
            return False
        return True

    def _udp_ip(self):
        try:
            address = (self._vps_ip, self._vps_port_udp)
            so = socket.socket(socket.AF_INET, socket.SOCK_DGRAM)
            so.sendto('Fuck you.'.encode('utf-8'), address)
            so.close()
            return True
        except:
            so.clese()

    def _get_local_ip(self):

        addrs = socket.getaddrinfo(socket.gethostname(),None)
        return addrs

if __name__ == "__main__":
    config = {'vps_ip':'127.0.0.1', 'vps_udp_port':'10000'}
    udp = 0
    mail = 1
    new_IP = IPs(config, udp, mail)
    new_IP.start()
代码需要python3环境,不过不用担心,目前树莓派预置了python3解释器,如果不放心的话用下面的命令:
sudo apt-get install python3代码比较简单,就不解释了,看看名字应该能懂。这个代码目前能够找到系统所有的IP地址,Windows,Linux和MacOS均可使用。效果:

开机启动
这个很重要,不然这代码就没有任何卵用了。方法如下:
将python代码保存到文件中,然后修改文件权限:
sudo chmod 777 文件名将文件路径加到/etc/rc.local文件中,注意这里要在exit 0之前加入才会生效:
路径/文件名 start大功告成!

留言